I am about to attempt to describe the methods and procedures that I use in the production of one of my Intarsia pieces.
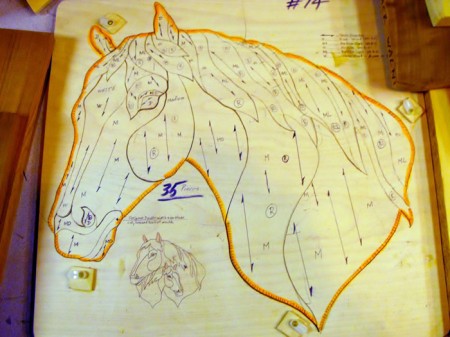 The photo, right, shows my pattern, #-14 Horse Head.
This pattern is not one that I drew myself, but one that I purchased. The #-14 indicated that it is the 14th. pattern that I did after I started doing Intarsia. At that time I had not yet started to draw my own patterns. The pattern was on a sheet of paper that I glued to a 1/8” thick piece of Baltic Birch plywood.
The next step is to cut out around the perimeter with a very small blade. I use a # 1 blade, which is the smallest available. This blade is 11/1000 of an inch thick. The reason for using the smallest blade is to remove as little material as possible. I then glue the perimeter to a piece of ¼” thick Baltic Birch plywood, and cut the rest of the pattern with the same size blade. All of the pieces now fit back into the inside of the perimeter piece like a jigsaw puzzle.
The highlighted lines around the perimeter, are to indicate to me that it is an outside
line and doesn’t need to fit against any other piece, and I can therefore cut on the inside of the line, and this makes it easier to fit it all together later.
Click on the thumbnails for larger images and the complete instructions.
I hope that I have explained the process, and if anyone is thinking about starting to do Intarsia, feel free to contact me for further explanation and help to get started……
Bill Dopson A.K.A. Woodworker Willie
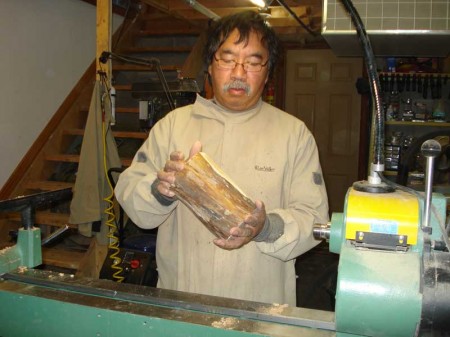
Morris looks for natural elements found in wood to make an interesting piece
To begin with most of my work is done before breakfast. I usually get up sometime between 5-6 am and head down to the workshop and depending on how challenged I’m feeling (or awake) will determine the morning project. I usually turn an item every day or two and the larger items may take a week. I turn logs, branches and blocks of wood to create decorative and functional works of art. Since my early teens I’ve had keen interest in creative expression. I’ve pursued interest in many mediums including leather and wood carving, drawing, painting, photography, woodworking and more recently wood turning.
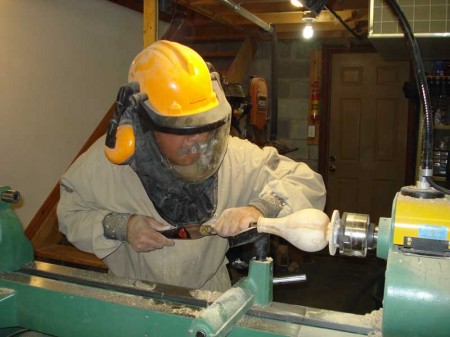
Here Morris is hollowing out the inside of a vase
My first encounter with a lathe was in Junior High School where I completed a small dish and in 2001 I purchased my first lathe. Mainly through self instruction I learned the basics in wood turning and since I have become an active wood turner. In 2002 I joined the Kawartha Woodturners Guild and continue to be an active member. I have given demonstrations on how to turn and color wooden flowers to both the Toronto and Kawartha Woodturners Guilds. I generally have about two tons of locally obtained wood at any given time in and around our home in Rosedale which can take up to two years of drying to become suitable for creating works of art. The wood is usually obtained from downed trees around our home. Friends and acquaintances will drop off wood right at my door step.
When I look at wood, I look for natural elements found in wood (many would consider this wood for the burn pile). In fact, a lot of my pieces of wood have been retrieved from burn piles destined for someone’s fireplace or stove. Anyway, I look for features such as bark inclusions, unusual figure, distressed areas, spalting, natural edges, sapwood/heartwood and color/grain contrast. I turn each piece to accentuate the grain, texture and natural color, often leaving traces of bark and natural decay to enhance the beauty that nature has already created.
[nggallery id=18]
I use a number of wood turning chisels to carve each piece of work. Each piece of wood really dictates the end product. I may start wanting to have a specific profile but once I open the wood it makes me skew from my original plan……that’s the beauty of turning, you are never sure of the end result or what beauty lies within.
Once the carving has been completed, I start sanding, beginning at about 120 grit and finishing with 400/600 grit. My favourite finish is Tung oil which accentuates the grain. The next step, while the lathe is turning about 1200-1500 rpm (where permitted) is to apply a mixture of shellac and Tung oil. The friction is used to create a very hard finish. The end result is a one-of-a-kind decorative or functional piece of art.
If my wife doesn’t abscond with it you will see it at one of my shows. Speaking of shows, I will be attending the following shows and retail stores.
- Earth to Art April 27-28 at the Lindsay Inn 345 Lindsay St. S Lindsay
- Station Gallery of Fenelon Falls May 19-Oct 8 103 Lindsay St. Fenelon Falls
- Valentia Arts Festival July 14 Valentia Church and Community Hall
- Kawartha Art Festival Sept 1-2 Fenelon Fair Ground 27 Veterans Way
- Victoria County Studio Tour Sept 29-30 and Oct 6-7
- My Favourite Thing 10 King St E Bobcaygeon Retail Store
- Galaxy Picture Framing and Gifts 104 Kent St W. Lindsay ON Retail Store
]]>