by Bill Dopson
I am about to attempt to describe the methods and procedures that I use in the production of one of my Intarsia pieces.
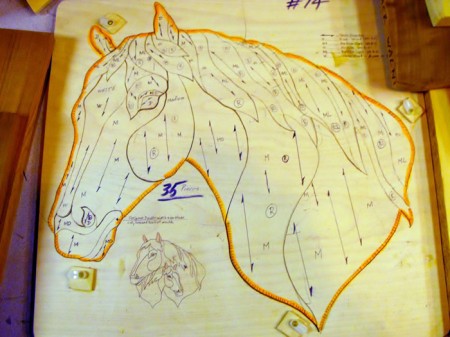
 The photo, right, shows my pattern, #-14 Horse Head.
This pattern is not one that I drew myself, but one that I purchased. The #-14 indicated that it is the 14th. pattern that I did after I started doing Intarsia. At that time I had not yet started to draw my own patterns. The pattern was on a sheet of paper that I glued to a 1/8” thick piece of Baltic Birch plywood.
The next step is to cut out around the perimeter with a very small blade. I use a # 1 blade, which is the smallest available. This blade is 11/1000 of an inch thick. The reason for using the smallest blade is to remove as little material as possible. I then glue the perimeter to a piece of ¼” thick Baltic Birch plywood, and cut the rest of the pattern with the same size blade. All of the pieces now fit back into the inside of the perimeter piece like a jigsaw puzzle.
The highlighted lines around the perimeter, are to indicate to me that it is an outside
line and doesn’t need to fit against any other piece, and I can therefore cut on the inside of the line, and this makes it easier to fit it all together later.
Click on the thumbnails for larger images and the complete instructions.
I hope that I have explained the process, and if anyone is thinking about starting to do Intarsia, feel free to contact me for further explanation and help to get started……
Bill Dopson A.K.A. Woodworker Willie

